Building a Blog with Next.js App Router and MDX
Published:
Updated:

In August, I put together a blog engine template during some between-client time at work to extend my skills. I wanted to use markdown for the article source, since it is both easy to read in raw format, and an industry standard supported by many different interpreters. I've been using React a lot at work in recent years, and more recently, Next.js as well, so this seemed like a good place to focus my efforts. Lastly, I wanted to make sure that it would be rendered server-side, since blogs are most useful if they are readable by search engines. (Also, when I renovated my website about a month later, I started from this template - it was pretty easy to switch over since many of my existing posts were already in markdown from using Pelican, and the ones that weren't were a fairly easy conversion from RST.)
When I got started, I found a lot of content for older versions of Next.js, using the Pages router, but the App router is so new that there wasn't much to go off of yet. If you're still using the Pages router but would like to add MDX interpretation and blog functionality, Ebenezer Don at Jetbrains' wrote a good article, Building a Blog With Next.js and MDX, and I also heavily referenced Julia Tan (bionicjulia)'s article, Setting up a NextJS Markdown Blog with Typescript.
If you just want to grab the template and go, it is available as a template repository on GitHub, or read on for a step by step walkthrough of the main points of configuration.
Getting Started: Initialize the Repository and Add Dependencies
The first step, if you aren't starting from a pre-made template repository, is to initialize the app using npx. To create a new Next.js app in a subfolder named nextjs-blog-app, use the command:
npx create-next-app nextjs-blog-app
The create-next-app tool will walk you through generating a basic Next.js app with default settings and a basic splash screen. For this walkthrough, I'm assuming you have selected Typescript and ESLint, are using the src/ directory, skipped Tailwind, and (obviously) selected the App router.
Before installing any dependencies, we'll set "type": "module" in package.json. If you do this first, it allows the best chance for any tools you install later to correctly set up their configuration files automatically, and is important to have imports working as expected. Then, to go with the "type": "module", check next.config.js and modify the export line:
// From:
module.exports = nextConfig
// To:
export default nextConfig
Markdown Dependencies
To handle markdown files in this project, we are using MDX. This enables a lot of neat features in the future if you want to set up the component imports, but even at a basic level gives you a lot of flexibility for importing and interpreting both pure markdown and .mdx files into a Next.js app.
First we need to install the main dependencies, and for Typescript users, the types:
npm install @mdx-js/loader @mdx-js/react @next/mdx next-mdx-remote
npm install -D @types/mdx
(Installing @types/mdx may be unnecessary, but it seems to have been more stable over updates to have it explicitly included.)
Then, we will add a mdx-components.js config file in the root directory, using an example from MDX:
// This file is required to use @next/mdx in the `app` directory.
export function useMDXComponents(components) {
  return components
  // Allows customizing built-in components, e.g. to add styling.
  // return {
  //   h1: ({ children }) => <h1 style={{ fontSize: "100px" }}>{children}</h1>,
  //   ...components,
  // }
}
Finally, change next.config.js to use MDX and parse the desired extensions:
import WithMDX from '@next/mdx'

// This configures any desired plugins in MDX.
const withMDX = WithMDX({
  options: {
    remarkPlugins: [],
    rehypePlugins: [],
  },
  extension: /\.(md|mdx)$/,
})

/** @type {import('next').NextConfig} */
const nextConfig = {
  // Configure pageExtensions to include md and mdx
  pageExtensions: ['ts', 'tsx', 'js', 'jsx', 'md', 'mdx'],
  // Optionally, add any other Next.js config below
  reactStrictMode: true,
}

export default withMDX(nextConfig)
File Parsing Utilities
There are a few dependencies we can add to make it far simpler and easier to get file paths and parse data out of files. For now, we'll just add them to the project; they'll come into play later when assembling our utility functions.
npm install gray-matter glob
Testing, Formatting, Etc.
If you would like to add a unit test engine, formatter, or other tools, now is a great time to do so, so you can have your repository ready to use TDD and all your code consistently formatted from the start.
Testing with Jest
I chose Jest for my setup due to familiarity. It had some interesting hurdles to get it working properly with the later addition of MDX, so I'm not sure whether it was the best choice or not, but I'll go over the setup I got working here.
-
Install Jest, the Jest JSDOM environment, and relevant Testing Library dependencies:
npm install -D jest jest-environment-jsdom @testing-library/jest-dom @testing-library/react -
Initialize Jest, using one of the options listed by Next.js's documentation to create a configuration file, or copy the config file from my template.
- If you want to take advantage of extensive configuration options, your best bet is to start by running
npm init jest@latestas this will generate an in-depth configuration file for you with many commented options you can explore. - If instead you'd just like to get going quickly, feel free to copy a template into
jest.config.js|tswith options already set. - Set up a script in
package.jsonto run tests, such as"test": "jest"so you can easily apply and store command line options later as needed.
- If you want to take advantage of extensive configuration options, your best bet is to start by running
-
If you're using Typescript files here, you will also have to add
ts-nodeand the Jest types package in order to start running Jest:npm install -D @types/jest ts-node -
Add a
setupTests.tsfile in thesrc/directory, and addimport '@testing-library/jest-dom/'to it. Make sure your config file includes the optionsetupFilesAfterEnv: ['<rootDir>/src/setupTests.ts'](if you're using my template example, it is already there). -
Build a basic sanity test to ensure the Jest suite can run. For example, next to the default generated
page.tsxfile, create a test file such as this:import Home from './page' describe('Home', () => { test('exists', () => { expect(Home).toBeDefined() }) })It doesn't have to be much, just enough to validate the Jest setup with a live test.
-
Run your tests.
npm run testWhen your configuration is successful, you will see something like this: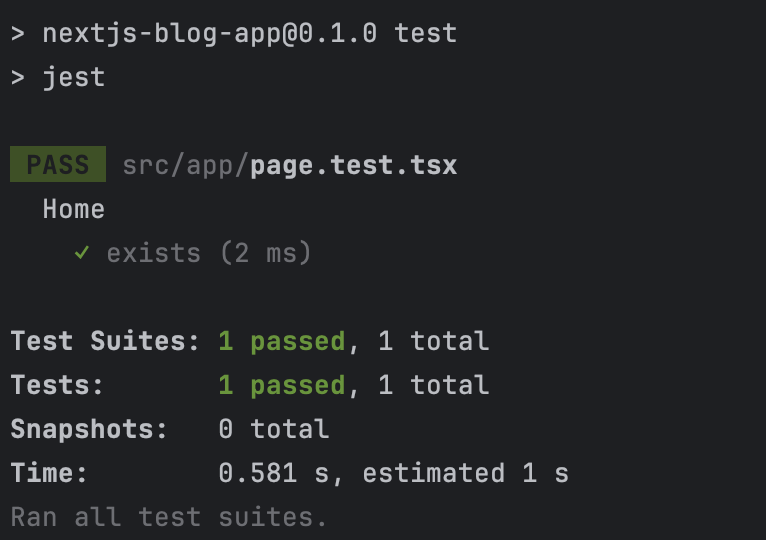
Set Up Prettier
This step is optional, but easier to get done at the beginning if you're planning on using it. There isn't anything unique about Prettier setup in this repository, unlike some of the other tools that have to actually ingest MDX data. The steps in brief:
npm install prettier- Add format scripts to
package.json. I use"format": "npx prettier --write .", and"format:check": "npx prettier --check ."which can be useful in a CI context. - Add a
.prettierignorefile in the root directory. You will want to ignore at leastnode_modulesand.next(the Next.js output directory). - Add a
.prettierrc.jsonfile in the root directory. These are some settings I prefer, but which settings to use is up to you as the developer (or your team if you're working with one):{ "tabWidth": 2, "semi": false, "singleQuote": true, "trailingComma": "all" } - Run your format script to start from formatted files.
Loading Markdown Content In JSX
To validate the MDX setup we just finished, let's create a content/ folder inside src/ and add a basic test markdown file that we'll then load in a page. A good test has a variety of markdown syntax in use, for example, something like this:
// src/content/test.md

# Test Markdown

This is a test markdown file. Let's try some common things:

- An unordered list of items
- With _emphasized_ and **strong** and **_strongly emphasized_** text
- `inline code snippets`
- a url https://www.github.com
- a link [GitHub](https://www.github.com)
- ~~strikethrough~~

```
A code block
```

> A block quote

A numbered list:

1. First item
2. Second item
3. Third item

## A second level header

### A third level header

#### A fourth level header
Then, we need to import this markdown into a page to be able to run the dev server and see it in action. One of the nice things about Next.js is that it is extremely simple to add additional routes to the project: you only have to create a new folder with the name of the route, and then create (in the app router) a page.jsx|tsx file. (This is slightly different for the older "Pages" router style, which we are not using here, but a similar idea.) So, let's create a new route named articles by creating a articles/ directory and adding page.tsx to it. Inside page.tsx, we'll place some basic code importing the test markdown file:
// src/app/articles/page.tsx
import Markdown from '../../content/test.md'

export default function Articles() {
  return (
    <>
      <h1>Articles</h1>
      <Markdown />
    </>
  )
}
Now, use npm run dev to start your local devserver, then navigate to http://localhost:3000/articles. If everything is set up correctly, you should see your Articles header with the markdown content below it:
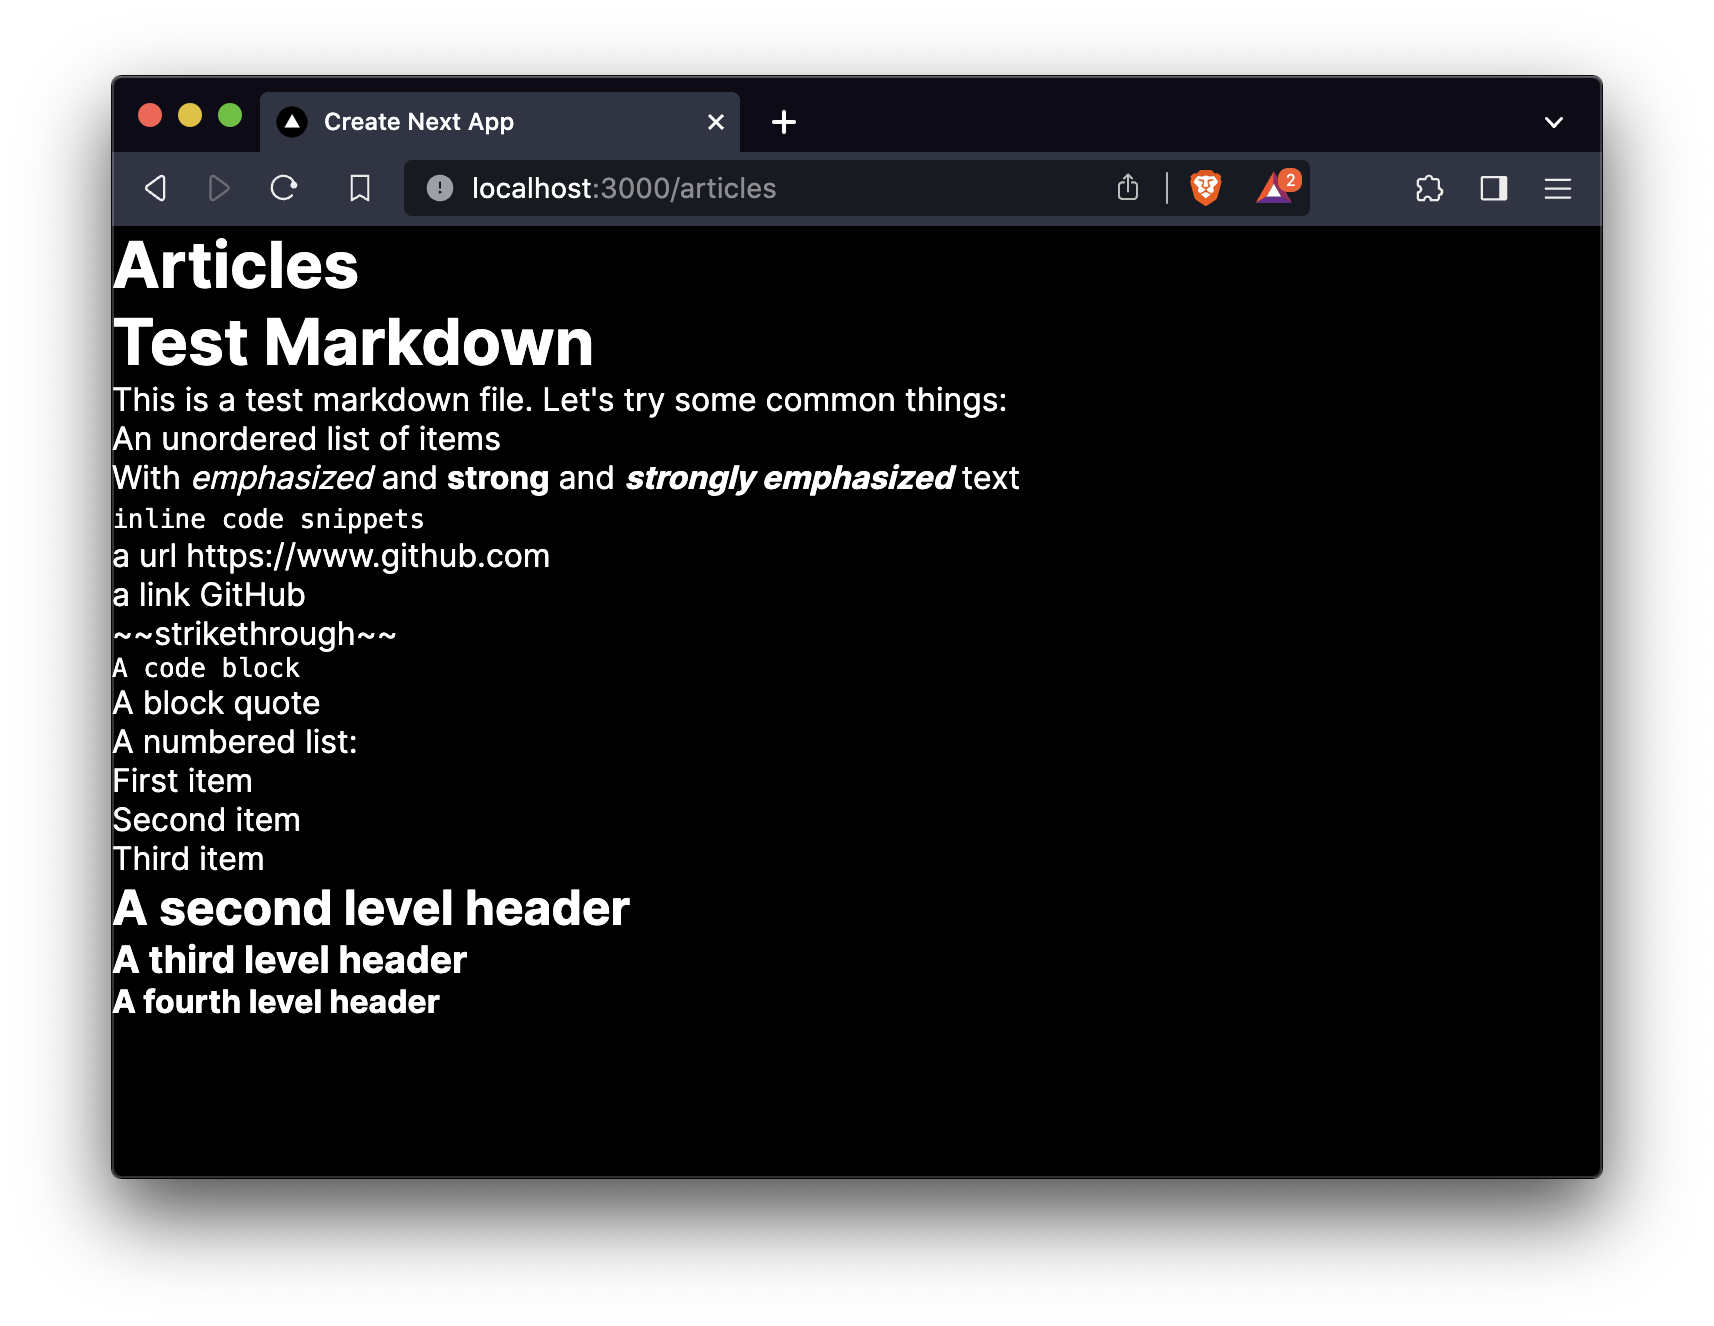
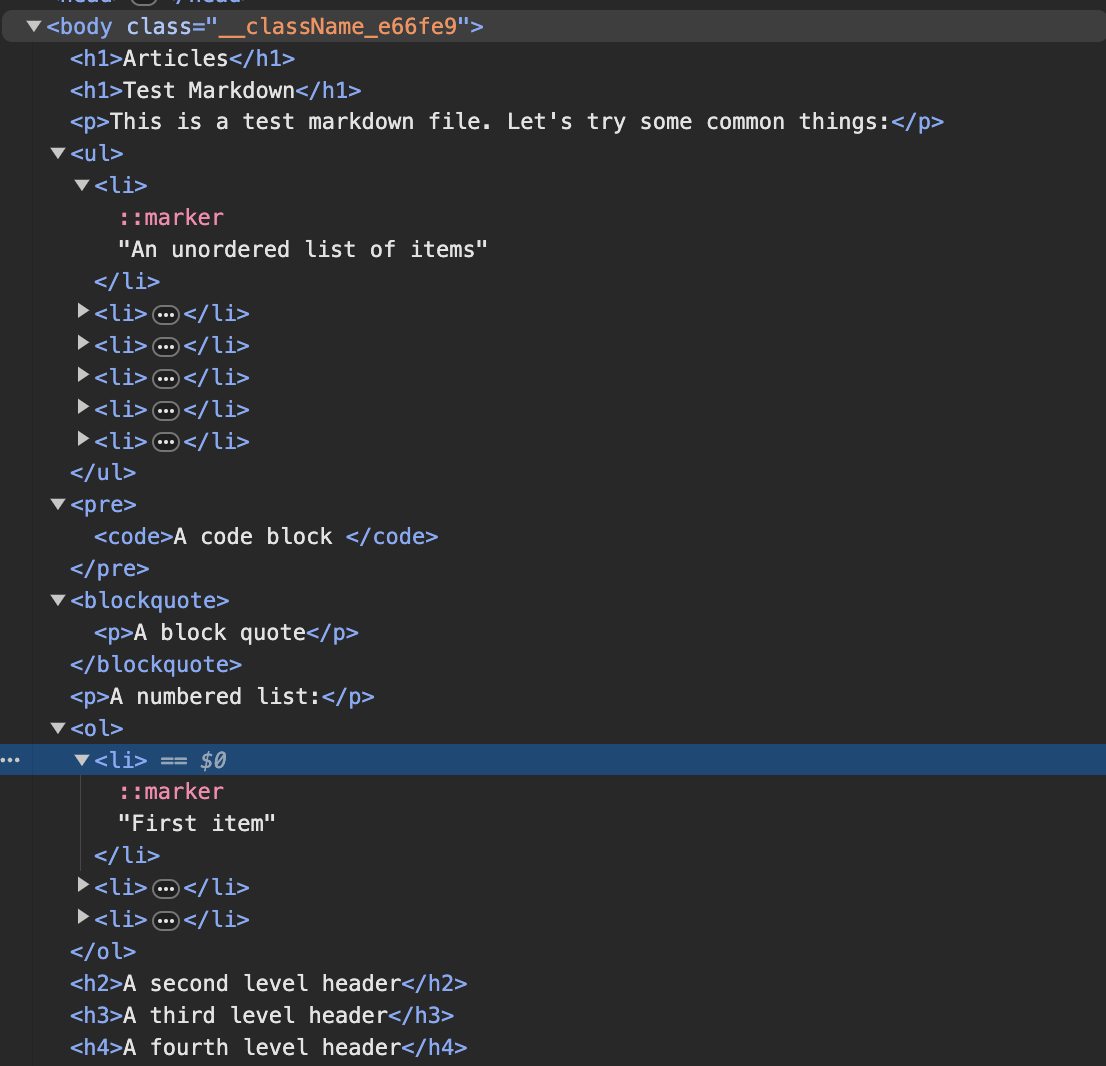
It doesn't look fantastic, but that's due to the default Next.js app styling, as you can see if you open the devtools and look at the generated code. All of the markdown has been converted into HTML tags as expected:
Dynamic Markdown Content From Files and Directory Structure
This would be about all you need if you just wanted to be able to import specific markdown into specific JSX files, but we're going to do more than that. It's time to set up dynamic routes and imports so new content is as easy as dropping a new markdown file in the right place.
Directory and File Parsing
Our next step is to add some logic for gathering the available markdown files to import, then importing them. This is where glob and gray-matter come into play. We need a place to keep our utility functions that won't be picked up as routes by Next.js, so let's use the _folderName private folder convention to create a utils folder: src/app/_utils/ and add a file named articles.ts. (Follow along with the template file if you'd like a full example.) Here you may want to set up some types before you get into the meat of the functions, such as a category type, an article data interface (for any YAML frontmatter that is included alongside the content, other than the content itself and its location), and an interface for an individual Article object including the data, content, and location information.
// src/app/_utils/articles.ts
export type ArticleCategory = 'categoryName' | 'otherCategoryName'

export interface ArticleData {
  publishedDate: Date
  modifiedDate?: Date
  title: string
  description: string
  tags: string[]
  thumbnailUrl: string
  category: ArticleCategory
  status: 'published' | 'draft'
}

export interface Article {
  data: ArticleData
  slug: string
  content: string
}
Next, we'll build a function that locates the content directory where our markdown is stored. This uses Node's process and path libraries:
// Add import at top of file:
import path from 'path'

// ...

// Then below the type declarations:
function getArticlesDirectory(): string {
  const root = process.cwd()
  return path.join(root, `src/content/articles`)
}
If you want to potentially store markdown in multiple subdirectories, for example below src/content/, you could instead parameterize this as shown in the template file. Next, we'll build a function to get filenames, using the glob library installed earlier. This library greatly simplifies parsing directory structures compared to building a recursion function yourself. If you want to use the subdirectory parameter I just mentioned, it should be a parameter for getFilenames as well and passed through to getArticlesDirectory. You'll be using this function elsewhere, so go ahead and export it.
// Add import at top of file:
import { globSync } from 'glob'

// ...

// Then below getArticlesDirectory:
export function getFilenames(): string[] {
  const articlesDirectory = getArticlesDirectory()
  return globSync(
    [articlesDirectory + '/**/*.md', articlesDirectory + '/**/*.mdx'],
    {
      absolute: false,
      cwd: articlesDirectory,
    },
  )
}
The string array returned from this function will be file paths including filenames relative to the articles directory, in this case src/content/articles/. They can include files in subdirectories, for example if you have articles organized by year, or in the base directory. These paths and filenames will also be used to generate the slug paths in the browser, so use something suitably user-facing. For example, the template repository has a file in src/content/articles/2023/nesty/article1-copy.md, which gets added to the array as 2023/nesty/article1-copy.md.
Now we get to the real meat of this utility collection, where we actually get a specific file and read it. (You'll see where we get the slug/file path when we build the dynamic route page later.) Let's break this down a bit at a time.
// Add imports at top of file:
import fs from 'fs'
import matter from 'gray-matter'

// ...

// Then below getFilenames:
export function getArticle(slugOrFilePath: string[]): Article {
  const basePath = path.join(getArticlesDirectory(), ...slugOrFilePath)
  const filePaths = globSync([basePath + '.md', basePath + '.mdx', basePath])
  const markdownWithMeta = fs.readFileSync(filePaths[0], 'utf-8')
  const { data, content } = matter(markdownWithMeta)
  const articleData: ArticleData = {
    publishedDate: new Date(data.date),
    modifiedDate: data.modified ? new Date(data.modified) : undefined,
    title: data.title,
    description: data.description,
    tags: data.tags,
    thumbnailUrl: data.thumbnailUrl,
    category: data.category ?? 'categoryName',
    status: data.status ?? 'published',
  }
  return {
    data: articleData,
    content: content,
    slug: path.join(...slugOrFilePath).split('.')[0],
  }
}
First we create the base file path out of the base directory and slug array. The slug array input here will be an array of segments, for example: ['2023', 'article-name'] if someone was at example.com/articles/2023/article-name/.
Then, we use this array input to globSync here to allow the ending article-name to refer to any of: [path]/article-name.md, [path]/article-name.mdx, or [path]/article-name with no file extension. It also ensures that if the array in the slugOrFilePath parameter includes the file extension on the last segment, it will still find the file. globSync will look for all three and return an array of whatever file paths it actually finds. (If for some reason you have duplicate files with different extensions, however, it will only read the first file in the array; if you anticipate this being a problem in your setup, you may want additional logic.) Then we attempt to read the actual file located. You'll notice there is no try...catch here. This is intentional, and allows us to use an error here to route the user to a 404 page if an invalid slug is entered. An error would most likely be caused by filePaths being an empty array if globSync did not find any matching files. There is some Next.js magic behind the scenes to make this work out in a live server environment, since Next.js will have already generated the list of possible valid paths and created files for them at build time; it still works out that any file that is not present generates an error here and catching that error in the page allows you to route to a not found.
After we read the contents of the file, we run it through matter to get the frontmatter YAML details. This is directly reading any YAML metadata (frontmatter) included in a markdown file. For the properties we're using here, we expect date, title, description, tags, and thumbnailUrl to be defined. We also check for values for modified, category, and status, with default values if they don't exist. The thumbnailUrl as we're using it should be a path relative to the public/images folder.
An example of what the YAML frontmatter might look like for one of these articles (using single quotes on the date strings to prevent matter from handling them unintentionally):
---
title: Title of Article
date: 'September 15, 2015'
modified: 'August 25, 2023'
description: A brief summary of the article that might appear in a list of articles
thumbnailUrl: '2023/maple-tree-8010467_640.jpg'
tags: ['test', 'article']
---
# Actual markdown content goes below this.
Finally, we take the typed data object we constructed and the content returned from the matter call, and construct the slug string by joining the input slugOrFilePath into a path, then split the file extension off of it if present. We now have a data object that can be used on a page! But it would be handy to get an array of all of the possible article data objects, too. Let's take care of that next.
To enable sorting articles by date, for example, to have your newest articles at the top of the page, you can make a quick sorting function:
function sortArticlesByDate(article1: Article, article2: Article) {
  const date1 = article1.data.publishedDate.getTime()
  const date2 = article2.data.publishedDate.getTime()
  return date2 - date1
}
Then we can use that and the other functions we've built here to get an array of articles to use when we want to display a list of articles.
export function getArticles(): Article[] {
  const filenames = getFilenames()
  return filenames
    .map((filename) => {
      return getArticle([filename])
    })
    .filter((article) => {
      return article.data.status !== 'draft'
    })
    .sort(sortArticlesByDate)
}
This does four things. First, we get a list of valid filenames. Then, we map each filename into an Article object. (You might notice that we pass the filename in as a single string in an array here, and wonder why we even take an array as this parameter; it has to do with how Next.js uses catch-all route segments and calling the getArticle function from the page that we'll build in the next section, with a slug from Next.js.) Third, we filter out any articles which show a status of 'draft', so you can work on content (and preview it directly at the slug URL) without having it show up in any user facing list of articles. Lastly, we use our sort function to keep newest articles at the top.
That's it for this section! In the template repository, there's one more function in this file, which allows filtering by category. If you're using multiple categories to filter and display content selectively, you can reference that filter and how it's used there.
Dynamic Routes
Now that we have our file parser set up, let's create a catch-all route segment for article slug paths. Inside the src/articles directory, create a new directory [...slugs], and add a page.tsx. It will also be handy to have a test page to work with, so go ahead and make a markdown file inside src/content/articles/. I'll assume we're naming it test-article.md:
---
title: Title of Article
date: 'September 15, 2015'
description: A brief summary of the article that might appear in a list of articles
thumbnailUrl: 'maple-tree-8010467_640.jpg'
tags: ['test', 'article']
---

Some text here that will display on the body of the article page.
I've included a maple tree image I sourced from pixaby, the same one that is in the template repository, but feel free to add whichever image you like. The image file will go in public/images/.
Now, in src/app/articles/[...slug]/page.tsx, we'll start using our utility functions to pull in the article data. We use Next.js's generateStaticParams function. This is the code that actually produces the list of valid routes, and the output will be an array of objects.
import { getFilenames } from '@/app/_utils/articles'
import path from 'path'

export async function generateStaticParams() {
  const filenames = getFilenames()
  // This regex will match either .md or .mdx, producing a valid URL from either.
  const markdownRegex = /\.md(x)?$/
  return filenames.map((filename) => ({
    slug: filename.replace(markdownRegex, '').split(path.sep),
  }))
}
The return value will be something like this, depending on the contents of your src/content/articles/ directory:
[
  { slug: ['test-article'] },
  { slug: ['article2'] },
  { slug: ['article1'] },
  { slug: ['2023', 'newest-article'] },
  { slug: ['2023', 'draft-test-article'] },
  { slug: ['2023', 'nested-directory', 'article1-copy'] },
]
Now, we'll use the slug in the body of the page to retrieve the desired markdown.
// Update the imports. Be careful to get MDXRemote from 'next-mdx-remote/rsc',
// as importing from 'next-mdx-remote' will not work with the App router.
import { getArticle, getFilenames } from '@/app/_utils/articles'
import { MDXRemote } from 'next-mdx-remote/rsc'
import { notFound } from 'next/navigation'

// ...

// After generateStaticParams:
export default async function ArticleBySlug({ params }: {
   params: { slug: string[] }
}) {
   try {
      const article = getArticle(params.slug)

      return (
              <>
                 <h1>{article.data.title}</h1>
                 <em>Created: {article.data.publishedDate.toLocaleDateString()}</em>
                 <br />
                 <MDXRemote source={article.content} />
              </>
      )
   } catch (e) {
      notFound()
   }
}
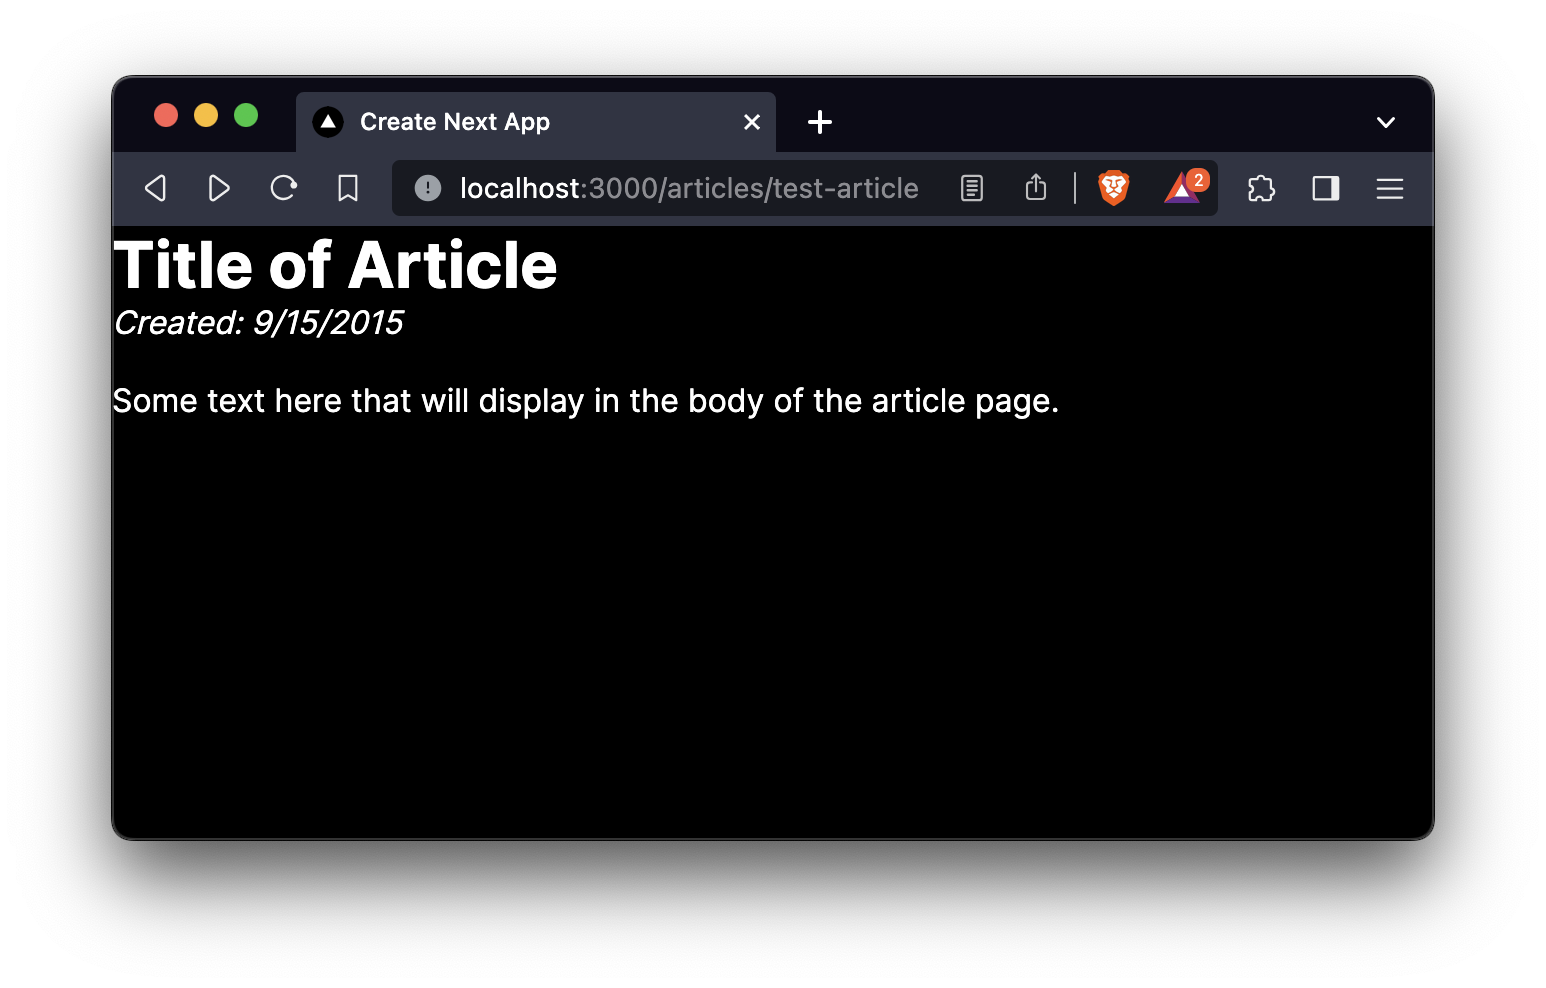
At this point you should be able to start the dev server, navigate to http://localhost:3000/articles/test-article, and see this:
From here, you can add things like the modified date...
{article.data.modifiedDate != undefined && (
  <em>Modified: {article.data.modifiedDate.toLocaleDateString()}</em>
)}
...or thumbnail image (just be sure to import Image from 'next/image'):
<Image
   src={`/images/${article.data.thumbnailUrl}`}
   alt="thumbnail"
   width={640}
   height={200}
   style={{ objectFit: 'cover' }}
/>
And, if you change out the slug for an address that doesn't exist, thanks to catch (e) { notFound() }, you'll get the default 404 page as well. This code also works with multiple layers of nesting, so you can have a file in src/content/articles/, or in src/content/articles/2023/, or in src/content/articles/projects/2024/, or wherever you like. As the code is set up here, everything after src/content will end up interpreted into a slug from the base / url of your website (but without further parametrization and additional routes, the articles/ segment is required).
Dynamic Article Lists
Now that we can load an individual article dynamically, we also want to be able to display a list of them for the user. The ground work for this was already done in the Directory And File Parsing section, let's put it to use.
Head back to src/app/articles/page.tsx. We don't need to import Markdown from... or the <Markdown/> component anymore, although if you want to manage static content via markdown files as well as the dynamic content, you can certainly continue to do so by direct import like this.
We'll start by getting our article data and assigning it to a constant.
import { getArticles } from '@/app/_utils/articles'

// ...

// Inside the body of the Articles component function:
const articles = getArticles('articles')
Then inside the return render, we'll map out the article array...
{articles.map((article) => (
  // ...
))}
Inside each map, we want to create a link with some information about the article. The easiest way to do this is by defining a separate component, and if you're following along with the template repository, that's what you'll see. Whether you define it separately or not, though, you'll want something like this (being sure to import Link from 'next/link').
<Link
  href={`/articles/${article.slug}`}
  data-testid={'article-card'}
  key={article.slug}
>
  <div
    style={{
    border: 'gray solid 1px',
    margin: '1em',
    padding: '0.75em',
    display: 'flex',
    flexDirection: 'row',
    }}
  >
    <div style={{ flex: 'auto' }}>
      <h3>{article.data.title}</h3>
      <p>{article.data.description}</p>
      <p>
        <small>{article.data.publishedDate.toLocaleDateString()}</small>
      </p>
      <p>
        <small>
          Tags:{' '}
          {article.data.tags.map((tag: string, index: number) => {
            return (
              <span key={tag}>
                {tag}
                {index !== article.data.tags.length - 1 && ', '}
              </span>
            )
          })}
        </small>
      </p>
    </div>
  </div>
</Link>
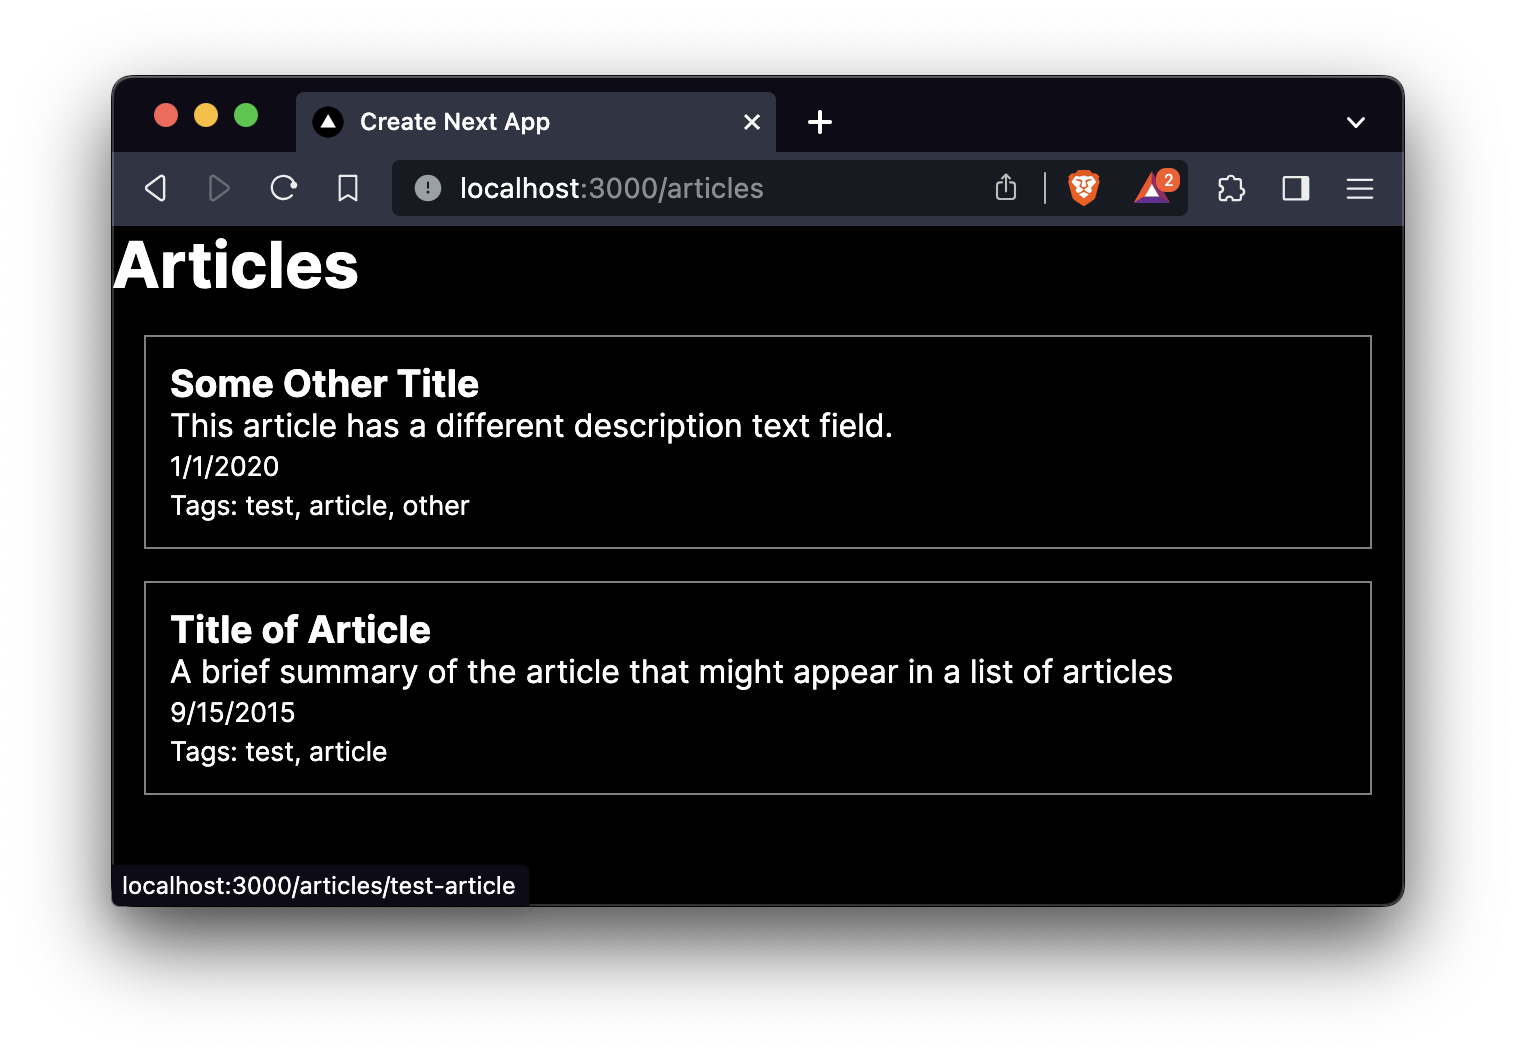
Now navigate to http://localhost:3000/articles, and...voila!
Now, other than styling and building out your navigation, your blog is ready to add articles to! But you know what would make it better? A Tags system! However, this article is long enough for today. To build out the tags, go ahead and check out part 2 of this article!